회사 프로젝트에서 API Gateway를 개발하면서 로그인과 토큰 발급을 위해 외부 OAuth에 연동시켰다. 단 이 때 자체 로그인 기능은 배제된 상태로 개발이 진행됐다.
그런데 최근 자체 로그인 기능을 추가하며 앞서 작성했던 코드를 다시 열었는데, 어떻게 작성했는지 기억이 나지 않았다.
역시 사람은 어딘가에 적어놓지 않는다면 까먹는구나 라는 사실을 다시 한 번 깨달았고, 맨날 적어야지.. 하면서 절대 안적어놓는 스스로의 게으름을 반성하고자 Spring Boot에서 OAuth2.0을 연동하는 방법을 적어놓을까 한다.
OAuth2.0
OAuth2.0은 인증을 위한 산업 표준 프로토콜이다. 사용자에가 굳이 비밀번호를 공유하지 않고도 사용자 대신 다른 서비스에 접근할 수 있는 권한을 부여하는데 사용된다.
OAuth2.0을 이용하면 아래와 같은 장단점이 존재한다.
- 사용자의 패스워드를 직접 처리하지 않기에 보안성이 좋다.
- 이미 사용하고 있는 계정으로 빠른 회원가입과 로그인이 가능해 편의성이 좋다.
- 유명 플랫폼을 통해 인증을 진행하기에 신뢰성이 좋다.
- 인증을 외부 서비스에 의존하게 될 수 밖에 없다. 해당 서비스가 변경되면 인증 관련 코드도 수정되어야 할 수 있다.
- OAuth2.0 서비스마다 제공하는 사용자 정보가 다르기에 이를 고려한 개발 과정이 필요하다.
오늘은 OAuth2.0을 사용해서 통합 로그인을 제공하는 방법에 대한 포스팅을 해볼까 한다.
로그인만 사용할거라 사실 SSO를 구현한다고 하는 게 맞으려나... 어쨌든...
SSO vs OAuth2.0
둘 모두 인증 절차의 단순화를 통한 사용자의 편의성을 높이기 위한 기술이다.
SSO는 한 번의 로그인으로 여러 서비스에 접근할 수 있게 해주는 인증 방식이다.
OAuth2.0은 사용자의 아이디, 비밀번호를 직접 공유하지 않으며 한 서비스에서 다른 서비스로 특정 권한을 부여하는 데 사용하는 개방형 프로토콜이다.
차이점이라면, SSO는 단순히 여러 서비스에 로그인만을 할 수 있게 해주는 반면 OAuth는 사용자 대신 로그인하고 몇몇 권한을 다른 서비스에 위임할 수 있게 해준다. 즉, SSO는 인증에 초점을 맞추고 OAuth는 인가에 초점을 맞춘다.
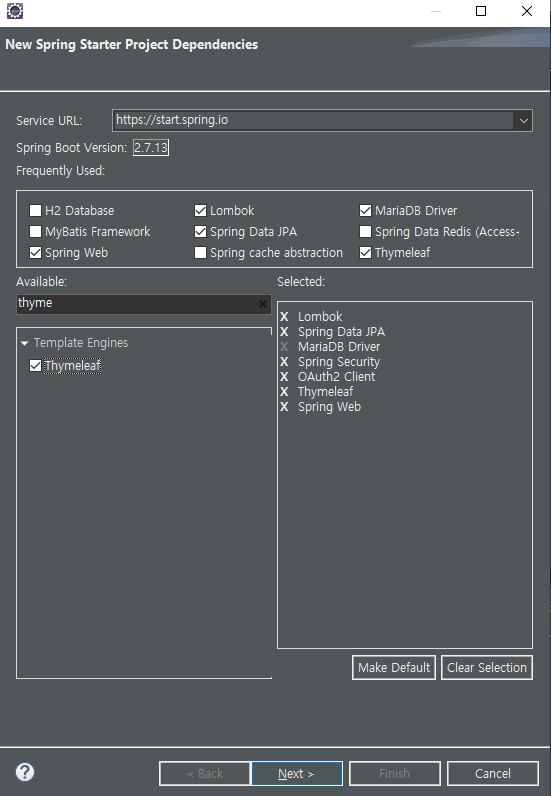
Spring Boot에서 Spring Security와 OAuth2.0 연동 (로그인만)
실습을 위해 우선 아래와 같이 Spring Starter 프로젝트를 생성했다.
application.properties를 작성한다. 우선 아래 항목과 같이 작성한다.
logging.level.root=info

# DB 연동
spring.datasource.driver-class-name=org.mariadb.jdbc.Driver
spring.datasource.url=jdbc:mariadb://localhost:3306/testdb
spring.datasource.username=root
spring.datasource.password=0000

spring.jpa.show-sql=true
spring.jpa.hibernate.ddl-auto=update
spring.jpa.database=mysql
spring.jpa.database-platform=org.hibernate.dialect.MySQL57Dialect

# Thymeleaf
spring.thymeleaf.prefix=classpath:templates/
spring.thymeleaf.suffix=.html

# OAuth2 연동
# 1. Google
# 사용자 인증 정보 > Additional information > 클라이언트 ID
spring.security.oauth2.client.registration.google.client-id=
# 사용자 인증 정보 > Additional information > 클라이언트 보안 비밀번호
spring.security.oauth2.client.registration.google.client-secret=
spring.security.oauth2.client.registration.google.redirect-uri=http://localhost:8080/login/oauth2/code/google
spring.security.oauth2.client.registration.google.scope=email

# 2. Naver
# 어플리케이션 정보 > Client ID
spring.security.oauth2.client.registration.naver.client-id=
# 어플리케이션 정보 > Client Secret
spring.security.oauth2.client.registration.naver.client-secret=
spring.security.oauth2.client.registration.naver.redirect-uri=http://localhost:8080/login/oauth2/code/naver
spring.security.oauth2.client.provider.naver.authorization-uri=https://nid.naver.com/oauth2.0/authorize
spring.security.oauth2.client.registration.naver.authorization-grant-type=authorization_code
spring.security.oauth2.client.provider.naver.token-uri=https://nid.naver.com/oauth2.0/token
spring.security.oauth2.client.provider.naver.user-info-uri=https://openapi.naver.com/v1/nid/me
spring.security.oauth2.client.provider.naver.user-name-attribute=response

# 3. Kakao
# 제품 설정 > 카카오 로그인 > 보안 > 코드
spring.security.oauth2.client.registration.kakao.client-id=
# 앱 설정 > 요약 정보 > REST API 키
spring.security.oauth2.client.registration.kakao.client-secret=
spring.security.oauth2.client.registration.kakao.redirect-uri=http://localhost:8080/login/oauth2/code/kakao
spring.security.oauth2.client.registration.kakao.authorization-grant-type=authorization_code
spring.security.oauth2.client.registration.kakao.client-authentication-method=POST
spring.security.oauth2.client.provider.kakao.authorization-uri=https://kauth.kakao.com/oauth/authorize
spring.security.oauth2.client.provider.kakao.token-uri=https://kauth.kakao.com/oauth/token
spring.security.oauth2.client.provider.kakao.user-info-uri=https://kapi.kakao.com/v2/user/me
spring.security.oauth2.client.provider.kakao.user-name-attribute=kakao_account
*spring.security.oauth2.client.registration.kakao.client-authentication-method=POST 가 없으면 아래 에러가 발생함.
[invalid_token_response] An error occurred while attempting to retrieve the OAuth 2.0 Access Token Response: 401 Unauthorized: [no body]
*kakao와 naver는 각각 사용자 정보가 들어있는 데이터를 지정해줘야 한다.
spring.security.oauth2.client.provider.naver.user-name-attribute=response
spring.security.oauth2.client.provider.kakao.user-name-attribute=kakao_account
만약 지정하지 않으면 아래 에러가 발생함.
[missing_user_name_attribute] Missing required "user name" attribute name in UserInfoEndpoint for Client Registration: kakao
보다시피 client-id와 client-secret은 비어있다. 이 부분은 각 연동 사이트에서 id와 secret을 할당받아 client-id와 client-secret에 넣어주어야 한다. 방법은 굳이 기재하지 않고 생략하겠다. (실수로 개인정보 올라갈까봐 무서워서 생략하는거 맞음)
참고로 각 사이트의 redirect-uri는 위 application.properties의 redirect-uri와 일치해야 함을 유의한다.
Google : https://developers.google.com/identity/protocols/oauth2?hl=ko
OAuth 2.0을 사용하여 Google API에 액세스하기 | Authorization | Google for Developers
이 페이지는 Cloud Translation API를 통해 번역되었습니다. Switch to English 의견 보내기 OAuth 2.0을 사용하여 Google API에 액세스하기 컬렉션을 사용해 정리하기 내 환경설정을 기준으로 콘텐츠를 저장하
developers.google.com
- API 및 서비스에서 사용자 인증정보 메뉴 진입
- 상단의 + 사용자 인증 정보 만들기 클릭 후 OAuth 클라이언트 ID 선택 (만약 템플릿이 없으면 우선 생성 후 재진행)
- 유형은 웹 어플리케이션, 이름 입력 후 리다이렉션 URI에 http://localhost:8080/login/oauth2/code/google 입력
- 만들기 후 다시 사용자 인증정보 메뉴에서 클라이언트 id와 비밀번호 확인
Kakao : https://developers.kakao.com/docs/latest/ko/kakaologin/common
Kakao Developers
카카오 API를 활용하여 다양한 어플리케이션을 개발해보세요. 카카오 로그인, 메시지 보내기, 친구 API, 인공지능 API 등을 제공합니다.
developers.kakao.com
- kakao developers 사이트 내 어플리케이션에서 어플리케이션 추가하고 진입
- 카카오 로그인 (동의항목) 메뉴에서 카카오계정(이메일) 선택 동의
- 플랫폼 메뉴에서 Web 플랫폼 등록. http://localhost:8080 입력
- 하단에 Redirect URI 등록하러가기 클릭
- 상단의 둘 다 활성화 후 http://localhost:8080/login/oauth2/code/kakao 입력
- 보안 메뉴에서 코드 생성
- 보안 메뉴의 코드와 요약 정보의 REST API 키 복사 (각각 SECRET과 ID로 활용됨)
Naver : https://developers.naver.com/docs/login/api/api.md
네이버 로그인 API 명세 - LOGIN
네이버 로그인 API 명세 네이버 로그인 API는 네이버 로그인 인증 요청 API, 접근 토큰 발급/갱신/삭제 요청API로 구성되어 있습니다. 네이버 로그인 인증 요청 API는 여러분의 웹 또는 앱에 네이버
developers.naver.com
- 어플리케이션 등록 진입 후 사용 API에 (네이버 로그인 / 연락처 이메일 주소) 지정
- 로그인 오픈 API 서비스 환경은 "PC 웹" 선택 후 서비스 URL에 http://localhost:8080 입력
- 하단의 Callback URL에 http://localhost:8080/login/oauth2/code/naver 입력
- 등록 완료 후 내 어플리케이션에서 id, secret 확인
세 사이트 모두에서 API 등록을 위한 어플리케이션 등록을 마쳤다면 이제 구현을 시작한다.
웹의 구동 방식은 아래와 같이 설계했다.
- OAuth2.0을 통해 로그인 기능 제공
- email, oauthType으로 구성된 테이블에 사용자 이메일과 oauthType 저장
- 로그인 성공 시 main 화면에서 email과 oauthType 정보 출력
이를 위한 클래스 구성은 아래와 같다.
- UserDomain.java : email, oauthType을 DB에 저장하기 위한 도메인
- UserRepository.java : UserDomain을 DB에 저장하기 위한 리포지토리
- UserService.java : User 관련 서비스
- CommonController.java : login, main 페이지 제공용 컨트롤러
- login.html : 로그인 페이지 html
- main.html : 메인 페이지 html
- OAuthLoginSuccessHandler.java : 로그인 성공 핸들러
- OAuthLoginFailureHandler.java : 로그인 실패 핸들러
- SecurityConfig : Spring Security 설정
각 클래스는 위 순서와 동일하게 작성했다.
우선 UserDomain을 관리하기 위한 도메인 클래스와 리포지토리 클래스를 작성한다.
UserDomain.java
package com.mwlee.oauth.user.domain;

import javax.persistence.Column;
import javax.persistence.Entity;
import javax.persistence.Id;
import javax.persistence.Table;

import lombok.AllArgsConstructor;
import lombok.Getter;
import lombok.NoArgsConstructor;
import lombok.Setter;

@Getter
@Setter
@NoArgsConstructor
@AllArgsConstructor
@Entity
@Table(name="user")
public class UserDomain {
	@Id
	@Column(name="email", columnDefinition="VARCHAR(100)", nullable=true)
	private String email;

	@Column(name="oauth_type", columnDefinition="VARCHAR(50)")
	private String oauthType;

}
UserRepository.java
package com.mwlee.oauth.user.repository;

import java.util.Optional;

import org.springframework.data.repository.CrudRepository;
import org.springframework.stereotype.Repository;

import com.mwlee.oauth.user.domain.UserDomain;

@Repository
public interface UserRepository extends CrudRepository<UserDomain, String> {

	Optional<UserDomain> findByEmailAndOauthType(String email, String oauthType);

}
이제 위 클래스를 다루기 위한 Service 클래스를 작성한다. 별도의 서비스를 두기 싫어서 DefaultOAuth2UserService를 상속받아 작성했고, 로그인 시 DB에 회원정보가 없으면 자동으로 저장하도록 작성했다.
UserService.java
package com.mwlee.oauth.user.service;

import java.util.Map;

import org.springframework.beans.factory.annotation.Autowired;
import org.springframework.security.oauth2.client.userinfo.DefaultOAuth2UserService;
import org.springframework.security.oauth2.client.userinfo.OAuth2UserRequest;
import org.springframework.security.oauth2.core.OAuth2AuthenticationException;
import org.springframework.security.oauth2.core.user.OAuth2User;
import org.springframework.stereotype.Service;

import com.mwlee.oauth.user.domain.UserDomain;
import com.mwlee.oauth.user.repository.UserRepository;

import lombok.extern.slf4j.Slf4j;

@Slf4j
@Service
public class UserService extends DefaultOAuth2UserService {

	@Autowired UserRepository userRepository;

	@Override
	public OAuth2User loadUser(OAuth2UserRequest userRequest) throws OAuth2AuthenticationException {

		// email, oauthType 호출
		Map<String, Object> attributes = super.loadUser(userRequest).getAttributes();
		log.info("ATTR INFO : {}", attributes.toString());

		String email = null;
		String oauthType = userRequest.getClientRegistration().getRegistrationId();

		OAuth2User user2 = super.loadUser(userRequest);

		// oauth 타입에 따라 데이터가 다르기에 분기
		if("kakao".equals(oauthType.toLowerCase())) {
			// kakao는 kakao_account 내에 email이 존재함.
			email = ((Map<String, Object>) attributes.get("kakao_account")).get("email").toString();
		}
		else if("google".equals(oauthType.toLowerCase())) {
			email = attributes.get("email").toString();
		}
		else if("naver".equals(oauthType.toLowerCase())) {
			// naver는 response 내에 email이 존재함.
			email = ((Map<String, Object>) attributes.get("response")).get("email").toString();
		}

		// User 존재여부 확인 및 없으면 생성
		if(getUserByEmailAndOAuthType(email, oauthType) == null) {
			log.info("{}({}) NOT EXISTS. REGISTER", email, oauthType);
			UserDomain user = new UserDomain();
			user.setEmail(email);
			user.setOauthType(oauthType);

			save(user);
		}

		return super.loadUser(userRequest);
	}

	// 저장, 조회만 수행. 기타 예외처리 및 다양한 로직은 연습용이므로
	public void save(UserDomain user) {
		userRepository.save(user);
	}

	public UserDomain getUserByEmailAndOAuthType(String email, String oauthType) {
		return userRepository.findByEmailAndOauthType(email, oauthType).orElse(null);
	}
}
다음으로 로그인 페이지와 메인화면 페이지를 작성하고, 해당 페이지들을 사용자에게 제공할 Controller 클래스를 작성한다.
참고로 로그인 페이지를 별도로 만들지 않으면 Spring Security에서 제공하는 기본 OAuth 로그인 화면이 출력된다.

CommonController.java
package com.mwlee.oauth.controller;

import org.springframework.stereotype.Controller;
import org.springframework.web.bind.annotation.GetMapping;

@Controller
public class CommonController {

	/**
	 * 로그인 페이지
	 * @return
	 */
	@GetMapping("/login")
	public String login() {
		return "login";
	}

	/**
	 * 메인 페이지
	 * @return
	 */
	@GetMapping("/")
	public String main() {
		return "main";
	}

}
login.html
<!DOCTYPE html>
<html xmlns:th="http://www.thymeleaf.org">
<head>
    <meta charset="UTF-8">
    <title>Login</title>
    <style>
        .center {
            display: flex;
            justify-content: center;
            align-items: center;
            height: 100vh;
            flex-direction: column;
        }
        .btn {
            width: 150px;
            height: 50px;
            margin-bottom: 10px;
            text-align: center;
        }
        .btn-google {
            background-color: gray;
            color: white;
        }
        .btn-naver {
            background-color: green;
            color: white;
        }
        .btn-kakao {
            background-color: yellow;
            color: black;
        }
    </style>
</head>
<body>
    <div class="center">
        <a class="btn btn-google" th:href="@{/oauth2/authorization/google}">Google Login</a>
        <a class="btn btn-naver" th:href="@{/oauth2/authorization/naver}">Naver Login</a>
        <a class="btn btn-kakao" th:href="@{/oauth2/authorization/kakao}">Kakao Login</a>
    </div>
</body>
</html>
main.html
<!DOCTYPE html>
<html lang="ko" xmlns:th="http://www.thymeleaf.org">
<head>
<meta charset="UTF-8">
<title>Insert title here</title>
</head>
<body>
	<div><i th:text="${session.user.email}"></i></div>
	<div><i th:text="${session.user.oauthType}"></i></div>
	<br>
	<input type="button" id="logOutBtn" value="로그아웃">
</body>


<script src="https://code.jquery.com/jquery-3.6.0.min.js"></script>
<script th:inline="javascript">
	$("#logOutBtn").on('click', function() {
		$.ajax({
			type : "POST",
			url : "/logout",
			success : function() {
				alert("로그아웃 되었습니다.")
				location.replace("/login")
			}
		})
	})
</script>

</html>
이제 로그인 성공/실패 시 사용할 핸들러 클래스를 작성한다.
성공 핸들러는 로그인 성공 시 메인 화면에서 사용자 정보를 출력하기 위한 세션 정보 저장 작업을 수행한다.
실패 핸들러는 사실 별 필요가 없어서 에러 발생 시 에러 로그만 찍기 위해 만들었다.
OAuthLoginSuccessHandler.java
package com.mwlee.oauth.config.handler;

import java.io.IOException;
import java.util.Map;

import javax.servlet.ServletException;
import javax.servlet.http.HttpServletRequest;
import javax.servlet.http.HttpServletResponse;
import javax.servlet.http.HttpSession;

import org.springframework.beans.factory.annotation.Autowired;
import org.springframework.security.core.Authentication;
import org.springframework.security.oauth2.client.authentication.OAuth2AuthenticationToken;
import org.springframework.security.web.authentication.SimpleUrlAuthenticationSuccessHandler;
import org.springframework.stereotype.Component;

import com.mwlee.oauth.user.domain.UserDomain;
import com.mwlee.oauth.user.service.UserService;

import lombok.extern.slf4j.Slf4j;


@Slf4j
@Component
public class OAuthLoginSuccessHandler extends SimpleUrlAuthenticationSuccessHandler {

	@Autowired UserService userService;

	@Override
	public void onAuthenticationSuccess(HttpServletRequest request, HttpServletResponse response,
			Authentication authentication) throws IOException, ServletException {

		// 토큰에서 email, oauthType 추출
		OAuth2AuthenticationToken token = (OAuth2AuthenticationToken) authentication;

		String email = null;
		String oauthType = token.getAuthorizedClientRegistrationId();

		// oauth 타입에 따라 데이터가 다르기에 분기
		if("kakao".equals(oauthType.toLowerCase())) {
			// kakao는 kakao_account 내에 email이 존재함.
			email = ((Map<String, Object>) token.getPrincipal().getAttribute("kakao_account")).get("email").toString();
		}
		else if("google".equals(oauthType.toLowerCase())) {
			email = token.getPrincipal().getAttribute("email").toString();
		}
		else if("naver".equals(oauthType.toLowerCase())) {
			// naver는 response 내에 email이 존재함.
			email = ((Map<String, Object>) token.getPrincipal().getAttribute("response")).get("email").toString();
		}

		log.info("LOGIN SUCCESS : {} FROM {}", email, oauthType);

		UserDomain user = userService.getUserByEmailAndOAuthType(email, oauthType);

		// 세션에 user 저장
		log.info("USER SAVED IN SESSION");
		HttpSession session = request.getSession();
		session.setAttribute("user", user);

		super.onAuthenticationSuccess(request, response, authentication);
	}

}
OAuthLoginFailureHandler.java
package com.mwlee.oauth.config.handler;

import java.io.IOException;

import javax.servlet.ServletException;
import javax.servlet.http.HttpServletRequest;
import javax.servlet.http.HttpServletResponse;

import org.springframework.beans.factory.annotation.Autowired;
import org.springframework.security.core.AuthenticationException;
import org.springframework.security.web.authentication.SimpleUrlAuthenticationFailureHandler;
import org.springframework.stereotype.Component;

import com.mwlee.oauth.user.service.UserService;

import lombok.extern.slf4j.Slf4j;

@Slf4j
@Component
public class OAuthLoginFailureHandler extends SimpleUrlAuthenticationFailureHandler {

	@Autowired UserService userService;

	@Override
	public void onAuthenticationFailure(HttpServletRequest request, HttpServletResponse response,
			AuthenticationException exception) throws IOException, ServletException {

		log.error("LOGIN FAILED : {}", exception.getMessage());

		super.onAuthenticationFailure(request, response, exception);
	}


}
마지막으로 가장 중요한 Spring Security를 설정한다.
SecurityConfig.java
package com.mwlee.oauth.config;

import org.springframework.beans.factory.annotation.Autowired;
import org.springframework.context.annotation.Configuration;
import org.springframework.security.config.annotation.web.builders.HttpSecurity;
import org.springframework.security.config.annotation.web.configuration.EnableWebSecurity;
import org.springframework.security.config.annotation.web.configuration.WebSecurityConfigurerAdapter;
import org.springframework.security.oauth2.client.userinfo.DefaultOAuth2UserService;

import com.mwlee.oauth.config.handler.OAuthLoginFailureHandler;
import com.mwlee.oauth.config.handler.OAuthLoginSuccessHandler;
import com.mwlee.oauth.user.service.UserService;

@Configuration
@EnableWebSecurity
public class SecurityConfig extends WebSecurityConfigurerAdapter {

	@Autowired OAuthLoginSuccessHandler oAuthLoginSuccessHandler;
	@Autowired OAuthLoginFailureHandler oAuthLoginFailureHandler;
	@Autowired UserService userService;

	@Override
	protected void configure(HttpSecurity http) throws Exception {

		http
			.csrf().disable()
			.authorizeRequests()
				// 로그인 페이지는 누구나 접근 가능하게.
				.antMatchers("/login/**").permitAll()
				.anyRequest().authenticated()
				.and()
			// oauth 로그인 설정
			.oauth2Login()
				// loginPage가 없으면 Spring Security가 제공하는 기본 OAuth 로그인 페이지가 나옴.
				.loginPage("/login")
				.userInfoEndpoint()
					.userService(userService)
					.and()
				// 성공, 실패 핸들러 등록
				.successHandler(oAuthLoginSuccessHandler)
				.failureHandler(oAuthLoginFailureHandler);

	}
}
모든 작업이 완료되었으면 이제 어플리케이션을 실행하고 로그인을 실행해본다.
로그인 화면

구글 기반 로그인

네이버 기반 로그인


카카오 기반 로그인


'실습 > 리눅스 서버 + 스프링 부트' 카테고리의 다른 글
| Spring Boot + Mybatis (0) | 2023.07.02 |
|---|---|
| Spring Boot + JSP (0) | 2023.07.02 |
| application 파일에서 자료구조(list, map) 사용법 (1) | 2023.05.28 |
| application.yml 적용법 (0) | 2023.01.15 |
| JPA에서 외래키 사용 (1) | 2022.12.13 |


