동기식과 비동기식?
메일을 보내는 상황을 예시로 들어보자. 사용자는 메일 전송을 위해 메일을 작성하고, 전송 버튼을 누르게 된다.
그리고 메일을 보내는 시간이 5초라면?
동기식은 그 메일이 전송 완료되는 5초동안 아무런 작업도 할 수 없다.
그에 반해 비동기식은 메일의 전송 버튼을 누르고 메일 전송이 완료되는 5초동안 다른 작업을 할 수 있다.
즉, 동기식은 요청과 그 결과가 동시에 일어나는 방식으로, 요청한 상황에서 결과가 주어져야 하기 때문에 다른 상황으로 바꿀 수 없다.
그에 반해 비동기식은 동시에 일어나지 않는 방식이라, 요청한 상황과 다른 상황에서 결과를 받을 수 있게된다.
RabbitMQ
메시지 브로커란 송신자(Publisher)로부터 메시지를 전달받아 수신자(Subscriber)에게 전달하는 프로그램이다.
메시지 브로커는 전달받은 메시지를 큐에 저장하며, 수신자가 확인하기 전까지 큐에 순서대로 유지된다.
RabbitMQ란 AMQP (Advanced Message Queing Protocol)을 구현한 메시지 브로커이다. 비동기 처리를 위한 메시지 큐 브로커이기도 하다. 카프카와 마찬가지로 Pub-Sub 방식을 지원한다.
참고로 AMQP란 플랫폼 독립적인 비동기 메시징을 다룬 프로토콜로, 브로커의 양쪽에 Producer와 Consumer가 존재하고 그 사이에 Queue가 존재하여 메시지를 주고받는다.
RabbimMQ의 구성

Publisher : 메시지를 보내는 사용자 혹은 프로그램 (=Producer)
Publish : 프로듀서가 Exchange에 메시지 전송
Exchange : 프로듀서가 전달한 메시지를 Queue에 전달
Route : Exchange => Queue
Queue : 메시지를 저장하는 버퍼로, Exchange에 바인딩된다.
Bindings : Exchange와 Queue의 연결
Consumer : 메시지를 받는 사용자 혹은 프로그램
1. Exchange, Queue 생성 및 바인딩
개발을 통해 앞서 설명한 구성요소들 중 Publisher와 Consumer를 만들어줄 예정이다.
하지만 나머지 구성요소들인 Exchange와 Queue는 코드가 아닌 직접 설정으로 만들어주어야 한다.
이 작업을 위해 <ip-address>:15672로 접속 후 설치 단계에서 만든 아이디와 비밀번호를 활용해 로그인을 하자.

일단 순서대로 Exchange부터 만들자.

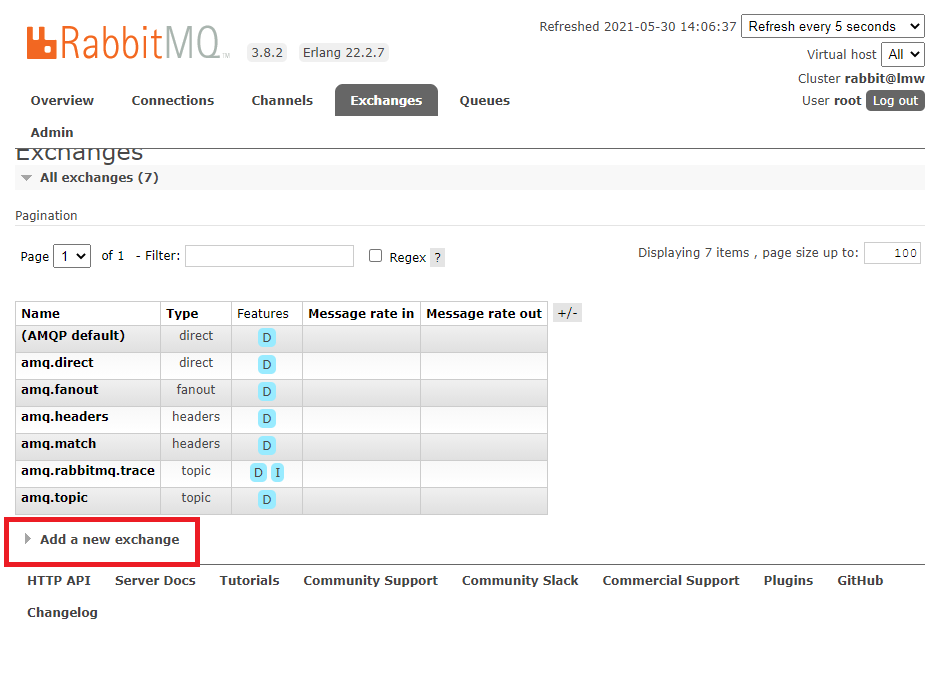
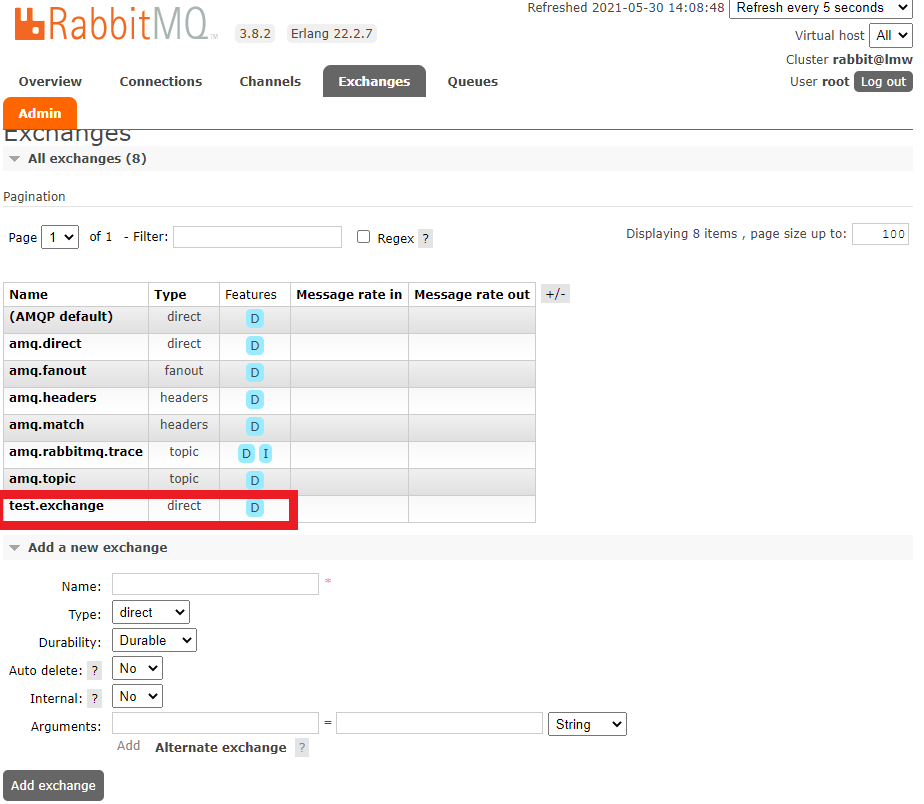
빈칸 중 다른 건 건들지 말고 Name만 test.exchange로 설정해서 넣어준다.
다 됐으면 이번에는 Queue를 만들 차례

마찬가지로 다른 설정은 건드리지 않고 이름만 넣어준다.
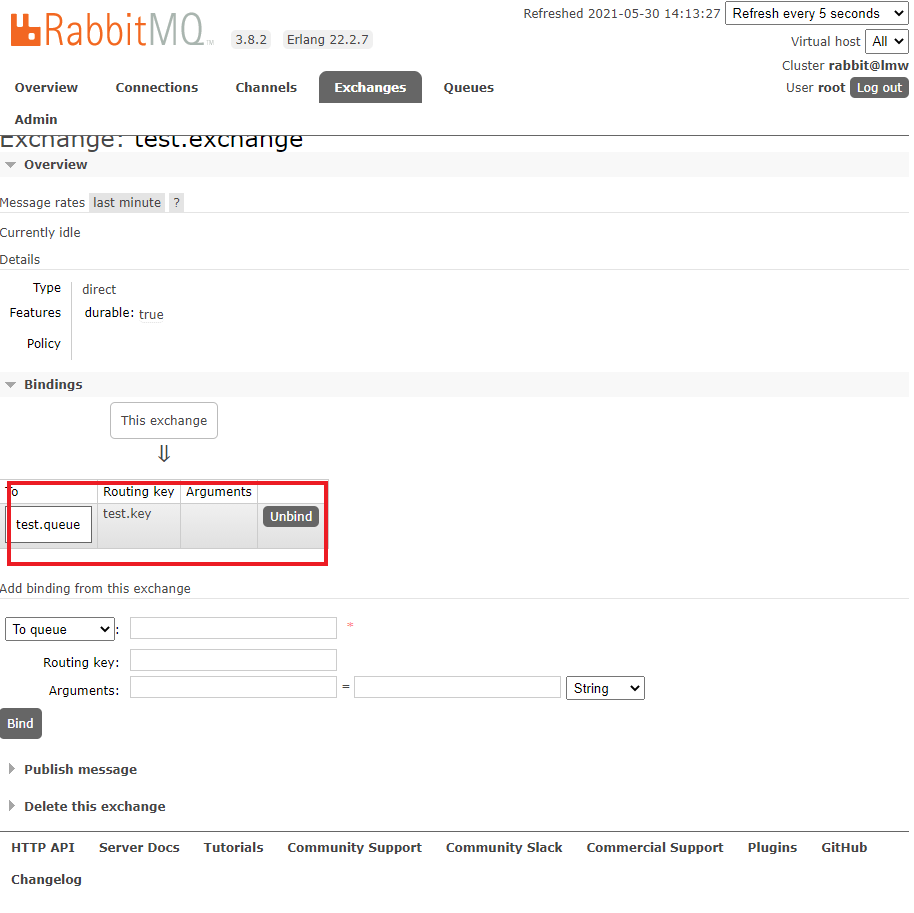
그러면 이번에는 바인딩을 해주자.
아까 만든 test.exchange Exchange로 들어가 방금 만든 큐를 Binding 해준다.
이 때 바인딩에서 Routing Key도 함께 test.key 정도로 설정해준다.
이로써 기타 구성요소들의 설정이 끝이났으므로,
코딩을 통해 Pulisher와 Consumer를 만들자.
일단 늘 그렇듯 먼저 application.properties 설정에 rabbitmq를 설정한다.

해당 포스팅에서는 application.properties에 모든 설정을 넣어두었는데,
굳이 위의 방식이 아니어도 아래와 같이 별도로 config 클래스를 만들어 설정할 수도 있다.
package com.example.demo.conf;

import org.springframework.amqp.core.Binding;
import org.springframework.amqp.core.BindingBuilder;
import org.springframework.amqp.core.Queue;
import org.springframework.amqp.core.TopicExchange;
import org.springframework.amqp.rabbit.connection.ConnectionFactory;
import org.springframework.amqp.rabbit.core.RabbitTemplate;
import org.springframework.amqp.support.converter.Jackson2JsonMessageConverter;
import org.springframework.amqp.support.converter.MessageConverter;
import org.springframework.context.annotation.Bean;
import org.springframework.context.annotation.Configuration;

public class RabbitConfig {
	private final String exchangeName = "test.exchange";
	private final String queueName = "test.queue";
	private final String routingKey = "test.key";

	@Bean public TopicExchange exchange() {
		return new TopicExchange(exchangeName);
	}

	@Bean public Queue queue() {
		return new Queue(queueName);
	}

	@Bean public Binding binding(Queue queue, TopicExchange exchange) {
		return BindingBuilder.bind(queue).to(exchange).with(routingKey);
	}

	@Bean public RabbitTemplate rabbitTemplate(ConnectionFactory connectionFactory, MessageConverter messageConverter) {
		RabbitTemplate rabbitTemplate = new RabbitTemplate(connectionFactory);
		rabbitTemplate.setMessageConverter(new Jackson2JsonMessageConverter());
		return rabbitTemplate;
	}
}
그러면 이제 Publisher와 Consumer를 만들자.
Publisher는 Rest를 기반으로 메시지를 전달받아 RabbitMQ로 보내도록 만들었다.
RabbitPublisher.java
package kr.co.opensource.rabbitmq;

import org.springframework.amqp.rabbit.core.RabbitTemplate;
import org.springframework.beans.factory.annotation.Autowired;
import org.springframework.stereotype.Service;

import lombok.extern.slf4j.Slf4j;

@Slf4j
@Service
public class RabbitPublisher {
	@Autowired RabbitTemplate rabbitTemplate;

	public boolean publish(String msg) {

		log.info("RabbitPublisher.publish publish message : {}", msg);

		try {
			rabbitTemplate.convertAndSend(msg);
		}
		catch (Exception e) {
			log.error("RabbitPublisher.publish can't publsh message : {}", e.getMessage());
			return false;
		}

		log.info("RabbitPublisher.publish successfully published message.");
		return true;
	}
}
RabbitController.java
package kr.co.opensource.rabbitmq;

import java.nio.charset.Charset;

import org.springframework.beans.factory.annotation.Autowired;
import org.springframework.http.HttpHeaders;
import org.springframework.http.HttpStatus;
import org.springframework.http.MediaType;
import org.springframework.http.ResponseEntity;
import org.springframework.web.bind.annotation.PostMapping;
import org.springframework.web.bind.annotation.RequestBody;
import org.springframework.web.bind.annotation.RestController;

import kr.co.opensource.ResponseMessage;
import kr.co.opensource.ResponseVO;
import lombok.extern.slf4j.Slf4j;

@Slf4j
@RestController
public class RabbitController {
	@Autowired RabbitPublisher publisher;

	@PostMapping("/rabbitmq")
	public ResponseEntity<ResponseVO> publish(@RequestBody(required=true) String message) {
		log.info("RabbitController.publish init");

		ResponseVO msg = new ResponseVO();
		HttpHeaders headers = new HttpHeaders();
		headers.setContentType(new MediaType("application", "json", Charset.forName("UTF-8")));

		boolean result = publisher.publish(message);

		if(!result) {
			msg.setStatus(HttpStatus.BAD_REQUEST);
			msg.setMessage(ResponseMessage.INTERNAL_ERROR);
			return new ResponseEntity<ResponseVO>(msg, headers, HttpStatus.METHOD_NOT_ALLOWED);
		}
		else {
			msg.setStatus(HttpStatus.OK);
			msg.setMessage(ResponseMessage.OK);
			msg.setData(message);
			return new ResponseEntity<ResponseVO>(msg, headers, HttpStatus.OK);
		}

	}

}
다음은 Consumer이다.
전달받은 메시지를 곧바로 이클립스의 콘솔 창에 출력하는 방식으로 간단하게 작성하였다.
RabbitConsumer.java
package kr.co.opensource.rabbitmq;

import org.springframework.amqp.core.Message;
import org.springframework.amqp.rabbit.annotation.RabbitListener;
import org.springframework.stereotype.Component;

import lombok.extern.slf4j.Slf4j;

@Slf4j
@Component
public class RabbitConsumer {

	@RabbitListener(queues = "${spring.rabbitmq.template.default-receive-queue}")

	public void receiveMsg(Message msg) {

		log.info("RabbitConsumer.revieveMessage recieved RabbitMQ message : {}", msg.toString());

	}
}
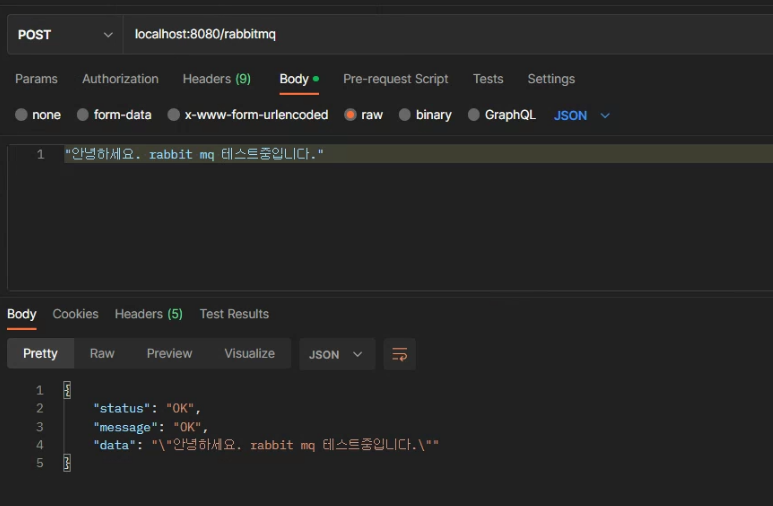
코딩을 완료하고 HTTP 통신을 해보면 정상 작동함을 확인할 수 있다.

'실습 > 리눅스 서버 + 스프링 부트' 카테고리의 다른 글
| 08. HAProxy (0) | 2021.05.30 |
|---|---|
| 07. Kafka_Pub&Con (0) | 2021.05.30 |
| 05. RestfulAPI_Redis CRUD (0) | 2021.05.23 |
| 04. RestfulAPI_MongoDB (0) | 2021.05.23 |
| 03. RestfulAPI_MariaDB (0) | 2021.05.19 |


